
More About Fall Colours in the Classroom!
| By Johnny Caryopsis | (Click links for more images.) |
Observing Leaf Senescence and Explaining Fall Colours
Demonstration 1: Plant Pigments Demonstration
You can demonstrate the concept of plant pigments; how different pigments can interact to produce various colours, and even how one colour can swamp others, using food colouring. (Refer to Fall Colours, in this issue for more background on plant photosynthetic pigments.) First of all you can show that some substances are not pigments by adding sugar or salt to water. They produce no colour effects at all; they are not pigments. Try adding a small amount of yellow food colouring to a test tube or jar of water until there is a noticeable yellow colour. Then add green colouring until the yellow is no longer visible, thus demonstrating that various pigments can be present while one may tend to dominate and swamp out the others. Measure the amount (drops) of green it takes to swamp out the yellow. In another (control) tube, add only green colouring and note the point at which the two are indistinguishable, despite having different combinations of pigments. Try adding red to the yellow to make various shades of yellow and orange or finally red. Add some blue to make various purples. A few plant pigments can create a wide range of fall colours, just by having different ratios. This is what really happens in nature!
During the growing season plants can have leaves of varying shades of green. You can produce many different shades of green, too, with just the 4 basic pigments (green, yellow, blue and red). Again, this is what happens in nature. Plants that have red or purple leaves during the growing season, like the now-common Schubert's chokecherry trees, contain purplish anthocyanin pigments that mask the underlying green photosynthetic pigments.
Demonstration 2: Collecting Over Time
You can document leaf senescence (the orderly death of leaves) and demonstrate some aspects of the appearance of fall colours by collecting and comparing leaves at different times.
- Select certain individual plants (trees or shrubs) and collect a few green leaves in early September, before senescence sets in. Press these in a plant press and keep them out of direct light.
- Collect more leaves from the same plants when the fall colours are at their peak and press these as before. (Be sure to put the date on each collection!)
- Finally, collect some leaves near the end of autumn, either any remaining on the plant or on the ground nearby and press these.
After a time compare the series of leaves, from the same tree or shrub and compare the differences in colour. In the absence of light, which speeds the decay of pigments, the colours will persist for a long time. Green leaves removed from the plant before the onset of senescence will still be green, despite being dead much longer than the last leaves you collected! Leaves collected at the height of fall colours should still be more brightly coloured than those allowed to age and fall from the trees naturally.
This demonstration also helps to explain why many introduced varieties of plants don't show attractive fall colours. Senescence is triggered by photo-period changes that are specific to the latitude where the plant evolved. Plant species rapidly adapt, through evolution, to the conditions of their immediate environment. As plants spread north after the last ice age they had to adapt to the shorter growth seasons and begin senescence earlier than they would further south. An introduced (exotic) plant that originates too far south, or from another geographical range where the climate is less severe (Remember, Vancouver is about the same latitude as Winnipeg!) will be overcome by the cold before it can go through its orderly shut-down for winter. So the leaves are killed by frost rather than being reclaimed by the plant, and they flutter to the ground, still green.
Demonstration 3: Fading Colour
To demonstrate how sunlight plays a role in the production of fall colours by fading the green chlorophyll pigment, try the following.
- Collect a few leaves from several different kinds of native trees or shrubs (exotic plant species may not work as well with this demonstration) while they are still green, before mid-September in southern Manitoba, earlier further north.
- Divide the leaves into two batches, with some of each kind in each batch.
- Take two sheets of plastic wrap or thin paper and tape the leaves from each batch to one of the sheets.
- Tape one sheet of leaves to a south-facing window, with the leaves facing the glass, so they are exposed to lots of sunlight.
- Place the other sheet in a well covered cardboard box (so that no light gets in) that you keep near the window with the other sheet of leaves. This way both sheets experience similar conditions, except for the sunlight.
- After a time (wait at least 2 weeks) you will notice that the leaves in the window have lost most of their green colour and, probably, now resemble fallen leaves.
- Take out the other leaves that you kept out of the light and compare them. These should still be green, though by now they will be dry and brittle, too.
These two sets of leaves have experienced near similar conditions (though you could argue the ones in the window will experience greater temperature changes), yet now look quite different. This difference is due to the decaying effect of strong sunlight on the chlorophyll pigment in the leaves.
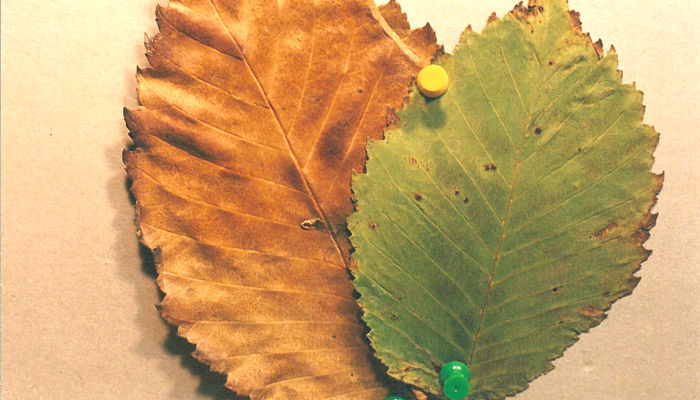
Demonstration results
An elm leaf from the window (left) vs. one from the press (right).
Demonstration 4: Fun With Fading
If you really want to get fancy, try this.
- In early autumn, locate a tree or shrub where there are leaves low enough for you to work with, and that is in a safe enough location, so they won't be tampered with or damaged. The leaves must still be green!
- Cut out some series of matching small shapes from some box board (cereal-box-type cardboard).
- Select some large leaves and staple the matching shapes to the front and back of the leaf, making sure the shapes align accurately. The idea is to prevent sunlight from reaching the part of the leave covered by the cardboard shapes.
- Watch for the fall colours to develop in your selected leaves, then carefully remove the leaves and take off the cardboard shapes.
The absence of sunlight should have resulted in the covered areas still being green, or at least not the same colour as the rest of the leaf. Use you imagination to make this demonstration of the cause of fall colours memorable.
|
Thanks for learning about Fall Colours in the Classroom! Bye for now!
Teachers, be sure to check out some of our other Classroom Features:
Silk Moths in the Classroom | Night Crawlers in the Classroom | Wood Frogs in the Classroom
Reference Books for Leaf Identification
A Guide to Field Identification: Trees of North America. 1968. By C. F. Brockman. Golden Press, New York, Western Publishing Co., Inc.A Field Guide to Trees and Shrubs: The Peterson Field Guide Series, No. 11. 1972. By G. Petrides. Houghton Mifflin Co., Boston. ISBN: 0-395-17579-8
Native Trees of Canada, 8th Edition. 1990. By R. C. Hosie. Fitzhenry & Whiteside Ltd. ISBN: 0-88902- 572-X
Identification Guide to the Trees of Canada. 1989. By J. Lauriault. Fitzhenry & Whiteside Ltd. ISBN: 0- 88902-564-9
| You can help NatureNorth produce more great articles with a secure donation through PayPal. Our Google Adsense ads pay our server costs, but that's about it. To learn more follow this link: Support NatureNorth. Thank-you! | |
Return to: Fall Issue | NatureNorth Front page